Creating and Assigning Roles for Namely Time
This article explains the process of how to create and assign employee and manager roles for Namely Time.
OVERVIEW
Roles are pre-defined settings in Employee Profiles that can be assigned to multiple employees, and can be created for different employee types. Changes made to a role apply to all employees with that role. Roles serve as templates for users with the same permissions, simplifying the assignment of permissions to multiple users. In order for a user to appear in Namely Time, roles must be created in both platforms.
CREATING ROLES
Setting Up Roles in HRIS
Before a role can be configured in Namely Time, you must first set it up in the HRIS:
-
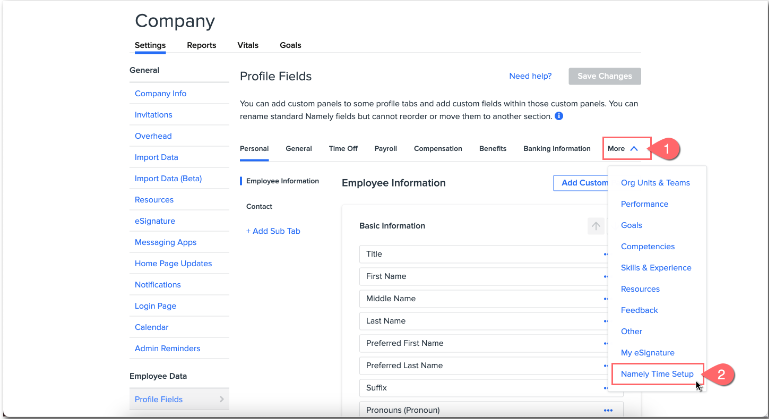
In Namely, your HRIS, go to the Company tab.
-
On the Company page, click Settings.
-
Under the Employee Data section, click Profile Fields.

-
Click on the More dropdown and select Namely Time Setup.
-
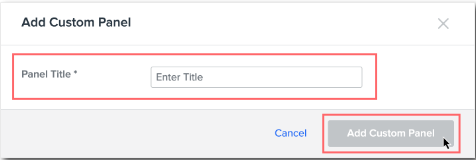
On the Namely Time Setup page, click Add Custom Panel. The window will appear prompting you to add a Panel Title. Choose a name for the panel that will encompass all your Namely Time roles. Then, click Add Custom Panel.
-
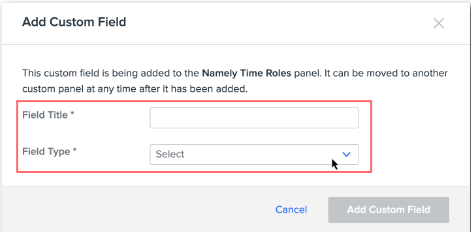
In the new panel you created, click Add Custom Field. You will be creating at least two custom fields, one for your employee roles and one for your administrator roles, but the process will be the same.
-
In the Add Custom Field window, create a Field Title for one type of your roles.
-
For example, Namely Time Manager Roles
-
-
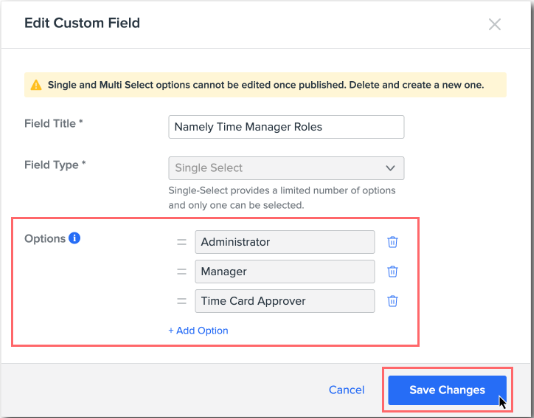
Select Single Select for your Field Type.
-
-
-
An Options field will appear. This is where you will add your individual roles. Click + Add Option to create more fields for more roles.
-
For example, Administrator, Manager, Time Card Approver, etc.
-
-
Click Save Changes.
-
Repeat for your other role(s).
-
Important: Remember exactly how each role is created because it will have to match the role in Namely Time exactly.
Note: The fields can all be changed at a later date by clicking the three dots next to each field and then selecting Edit.
-
Back on the main Namely Time Setup page, click Save Changes in the top-right corner.
Setting Up Employee Roles in Namely Time
Now you will have to add an employee role in Namely Time (accessed via Admin Tools > Manage Timesheets) in order for the role information to sync between Namely Time and your HRIS. The employee role must be entered exactly (including punctuation, if applicable) as it was entered in the HRIS.
-
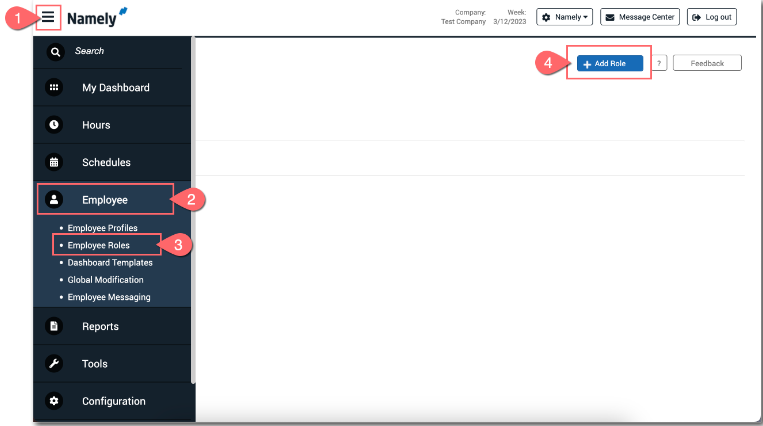
In Namely Time, open the navigation bar and select Employee Roles under the Employee section.
-
Click Add Role.
-
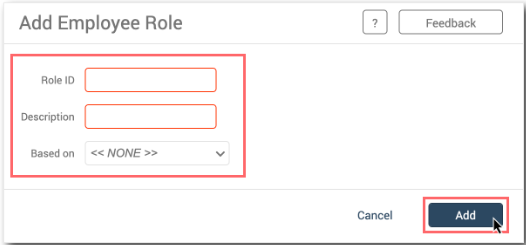
The Add Employee Role window will appear. For the Role ID field, match it to the role added in the Options field in your HRIS. Make sure the Role ID matches verbatim to ensure that employees will properly sync to the Namely Time platform.
-
Add a Description to the field. It can be the same as the Role ID.
-
Leave the Based on field as << NONE >>, and then click Add.
Configuring Admin Roles in Namely Time
Next, you will need to create a User Role in Namely Time. User roles are the equivalent of the Namely Time Admin Roles that are created in the HRIS platform. Below are the instructions on how to create a user role in Namely Time:
-
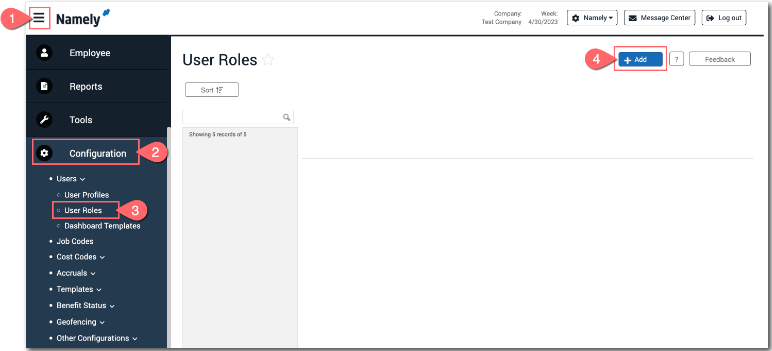
In Namely Time, open Configuration in the navigation bar and select User Roles under the Users.
-
On the User Roles page, click Add.
-
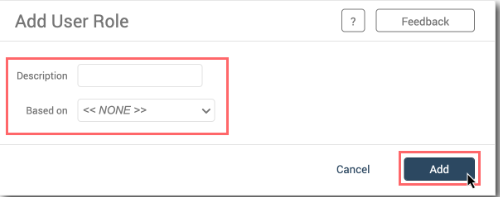
The Add User Role window will appear. For the Description field, match it to the role added in the Options field in your HRIS. Make sure the Description matches verbatim to ensure that admin will properly sync to the Namely Time platform.
-
Leave the Based on field as << NONE >>, and then click Add.
-
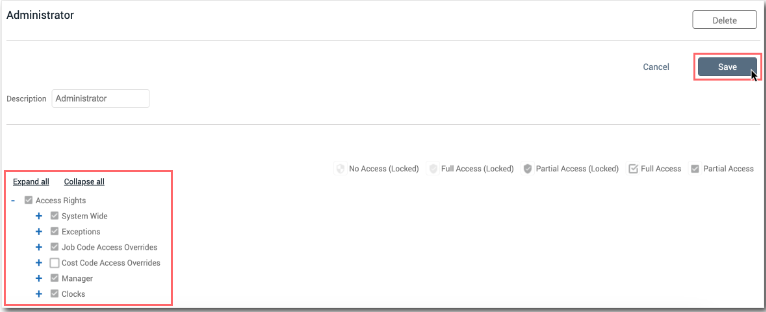
On the main User Roles page, select the Admin Role you just added, and then select the Access Rights this Admin Role will have. Use the +/- to expand and collapse options.
-
Click Save.
ASSIGNING ROLES
Individual Profile Assignments
In order for any user, admin or employee, to appear in Namely Time, they must be assigned to a Namely Time Role from their HRIS profile. This can be done individually by following the process below or it can be done by importing a spreadsheet with the roles assigned to each employee. See the next section for instructions.
-
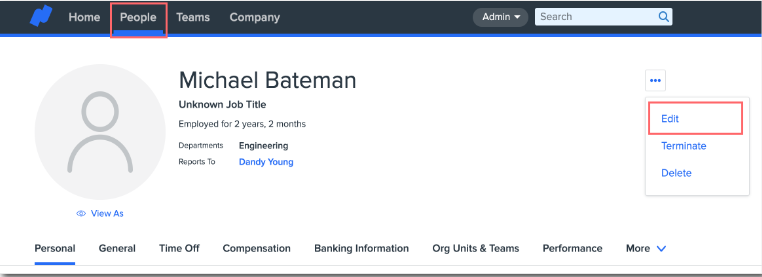
In your HRIS, navigate to the user's profile under the People tab in HRIS.
-
Click the three dots in the top-right corner of the profile and select Edit.
-
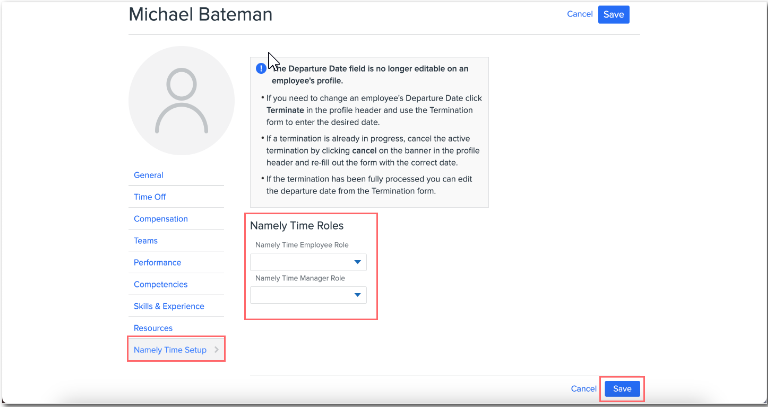
Click Namely Time Setup from the navigation panel.
-
The Namely Time Roles page will appear. Select the roles you want for this user. Users can have more than one role.
-
For instance, a user may need to manage time for their direct reports, but also need to clock in and out themselves.
-
Mass Import Assignment
Importing a list of employees with their user roles will be the fastest option and also allow you to view all employees at once to make edits. Use this Namely Time User Role Template to create your spreadsheet.
-
Download and fill out the template.
-
Email Address should be used as the Unique Identifier.
-
-
To import your spreadsheet, navigate to the Company page in your HRIS, and click Import Data in the navigation panel.
-
Click New Import.
-
The Upload Data page will appear. Click Choose File in the General Import section.
-
Your computer files will appear in a new window. Navigate to and select the spreadsheet you created with all your user roles.
-
You should see your file name appear in the General Import section. Click Upload CSV file.
-
The Upload Files & Assign Fields page will appear. Choose Email under Assign Fields.
-
Match the spreadsheet column titles, Namely Time Employee Role and Namely Time User Role, to the Namely Field name you created earlier. For example, the Namely Time User Role column will connect with the Namely Time Admin Role field we created.
-
Click Continue.
-
The Review Import page will appear. After reviewing that everything looks accurate, click Import Data.
TIP:
-
The template must be imported as a .csv.
-
The roles must be configured prior to importing.
-
One row per employee. If an employee has both an employee and manager role you would add the applicable role to each column
-
Roles are space and case sensitive. We recommended you copy and paste user roles from either Namely Time or HRIS in order to populate the template.
-
If a Role Description in Namely Time is updated, this will break the connection between HRIS and Namely Time. If this happens the role must also be updated on the Company Level in HRIS then reassigned to employee HRIS Profile.